Eclipse
From Resin 3.0
(This page is incomplete and currently being actively updated!)
Resin includes excellent support for Eclipse much in the same fashion as other Java application platforms like GlassFish, JBoss and Tomcat. This page describes the details of the Resin Eclipse plugin.
Eclipse Versions Supported
Like Tomcat, GlassFish and JBoss the Resin Eclipse plugin is based on WTP. You must have WTP installed for the Resin plugin to work. Generally, if you download the Eclipse IDE for Java EE Developers, it will automatically include WTP. Otherwise, you can add WTP to your Eclipse installation yourself.
The Resin Eclipse plugin supports Helios (Eclipse 3.6) and above. For Indigo (Eclipse 3.7) and above, the Resin plugin need not be installed via the Resin Eclipse plugin update site (http://www.caucho.com/eclipse) since the Resin plugin is already registered with Indigo. For previous versions, you must install the plugin from the Resin Eclipse plugin site. Both sets of installation instructions are described below.
Installing through Eclipse Server auto-discovery
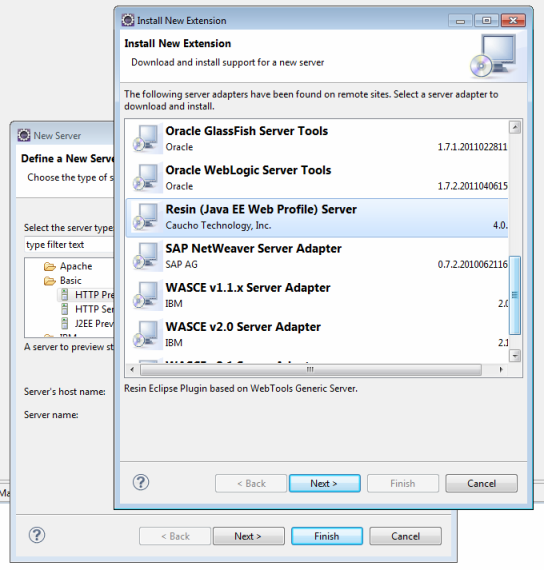
To install Resin on Indigo or above, go to the 'Servers' View - it is typically in the bottom tabs (make sure you are in the Java EE Perspective). Right click and select 'New->Server'. In the 'New Server' dialog, you will likely not see Resin as an option. To install Resin, you will have to click on the 'Download additional server adapters' option. It will take a few seconds for the 'Install New Extension' dialog to fully load. Once it loads, select the 'Resin (Java EE Web Profile) Server' option and click 'Next'.
Accept the license terms to start the installation (you might also get an "unsigned content" warning to proceed with the installation). The installation might take a few minutes.
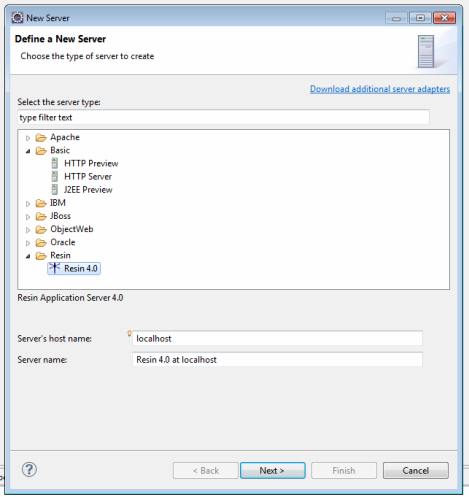
Once the installation finishes, you may be asked to restart Eclipse. You should verify a successful installation by checking if Resin is included in the 'New Server' dialog.
Installing from the Resin Eclipse plugin update site
Eclipse versions prior to Indigo did not have Resin automatically registered as a server option. For these versions, you will need to install the Resin plugin yourself directly from the Resin Eclipse plugin website (http://www.caucho.com/eclipse). One very nice side-effect of the manual plugin installation option is that you can download the very latest pre-release Resin Eclipse plugin snapshot from the snapshot site (http://www.caucho.com/eclipse-snapshot).
To install the plugin, you must first register the plugin website as an Available Software Site in Eclipse. You do this by going to 'Help->Install New Software...->Add...'. In the 'Add Repository' dialog, enter a name and the location for the Resin Eclipse plugin website (http://www.caucho.com/eclipse).
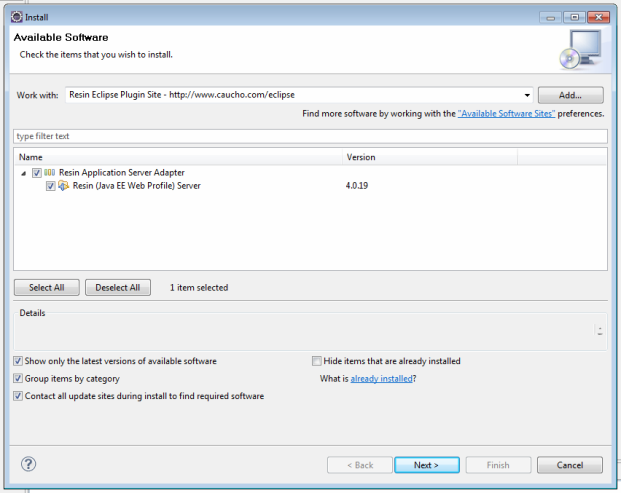
After clicking OK, the plugin site will be registered. After the site is registered, select "Resin (Java EE 6 Web Profile) Server" and click 'Next'.
Review the installation and click 'Next' again. Accept the license terms to start the installation (you might also get an "unsigned content" warning to proceed with the installation). The installation might take a few minutes. Once the installation finishes, you may be asked to restart Eclipse. Once the installation finishes, go to the 'Servers' View - it is typically in the bottom tabs (make sure you are in the Java EE Perspective). Right click and select 'New->Server'. In the 'New Server' dialog, you will see Resin as an option.
Creating a server runtime
Server runtime is synonymous to a class in java. Using one server runtime multiple servers can be configured. Basically, the runtime is resin distribution and 'servers' are RESIN_ROOTs
Runtimes are selected or created on the first page of "New Server" wizard. To create a new Runtime push "Add... " button.
License File
License is requested once per runtime and only if selected directory does not have any *.license files in RESIN_HOME/licenses
License is optional. Programmers can totally skip it.
Server Configuration
This page allows to choose method of publishing "git", "war" or exploded directory. All methods now require a username and a password which are now prefilled with 'admin' and 'password'. This is needed in order to restart an application automatically after deploying.
Host field on the first page defaults to localhost, but in case of remote deployment must be changed to that of remote Resin install.
Webapps directory
When prefixed with / or x:\ considered an absolute path, otherwise considered rooted at RESIN_ROOT.
Port
It must correspond to the HTTP port of Resin.
resin.xml configuration
The plugin uses default configuration supplied with Resin. For remote deployment and restart purposes it adds <resin:RemoteAdminService/>. For users it adds an admin-users.xml with the user supplied in the dialog.
The Resin Eclipse plugin is available on the Caucho Eclipse update site at http://caucho.com/eclipse. It is based on the WTP framework and features deployment modes for Resin 3.1 and 4.0.
Deployment styles
- .war file (default) - the plugin builds a .war file of your project, then starts Resin and copies the .war to the live deploy directory.
- Temporary directory - the plugin builds a .war file of your project, then starts Resin and copies the .war to a temporary deploy directory.
- In-place - the plugin starts Resin, then points it to server your project directly out of the workspace.
- Hot-deploy - (Resin 4.0 only) the plugin builds a .war file of your project, then starts Resin and uses Resin's Git deployment functionality to deploy
Options for configuration
- The very basic configuration that's included with the plugin itself
- The configuration in the "conf" subdirectory of the Resin home
- A configuration somewhere else in the file system (e.g. /etc/resin).
If you're starting a new project and don't need to do anything fancy, the first option is recommended, copying the configuration from the plugin. If you do need to use a custom configuration, you may need to modify it to recognize the variables that the plugin sets at runtime. The dialog box tells you what these variables are and how to set them, depending on which server profile you use.
Notes
- Eclipse must be run with a JDK, not simply a JRE, to use the Resin plugin.
- The Resin plugin must be run on Eclipse Galileo with Java EE.
- Windows Vista/7 users: administrator privileges may be required to install plugin.
References
- Resin Eclipse plugin snapshot (2009-08-18) - Blog post about using the plugin's Server configuration
- Remote deploy in Resin, Part 2 (2009-01-29) - Blog post about using host deploy


